How To Build A Willow Den
Posted by Little Trekkers on 17th Jun 2024
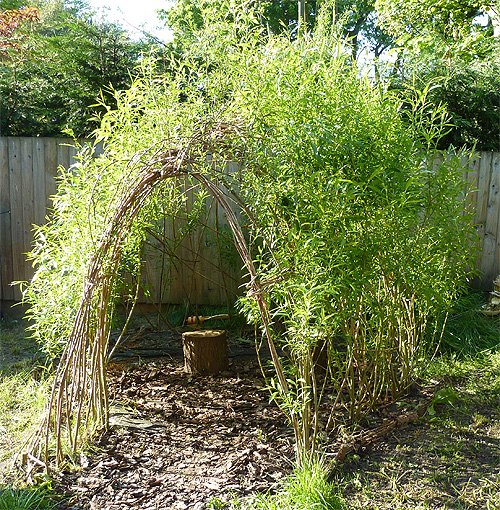
Building a Living Willow Den is easier than it looks and loads of fun. It will last for years, continually changes, and fits in naturally in the garden. Children love playing in willow structures as they feel like a ‘proper den’ rather than a shop bought ‘play house’. Schools and early years’ settings focus on creating natural play settings and Willow Dens are a perfect addition. A great way for children to enjoy being outdoors throughout the year.
What you need
- Living Willow Whips – Salix Viminalis variety - 6’, 7’, 8’ or 9’ lengths
- Strong garden string
- Spade or garden fork
- Weed matting (optional)
- Play Bark (optional)
How to make your Willow Den
Find a suitable spot for your willow den and mark the footprint using your spade, some string or sand. For perfectionists – mark the centre of your den with a post and attach a piece of string half the diameter of your den to create a perfect circle. For the non-perfectionists, stand in the middle and hold onto a small child’s hand whilst they circulate and let go of sand from their other hand.
Whether or not you use weed matting is a personal preference. If you have a sunny garden and make the entrance large enough to permit mowing, grass growing inside the den can look great. If weeds are a concern, weed matting is a good idea. Play bark can then be added for a more natural feel. This can be extended around the base of your planted willow whips as a moisture retaining mulch.
“If you allow an adult to help, make sure you pay attention and remind them that they have size 11 feet when they are digging with a spade”

Secure the weed matting into the ground. Our ground was quite soft. If your soil is heavy or compacted, digging over the soil around the circumference before adding the matting can help when you come to plant your willow whips. Compost can also be dug in if required, but this is not essential. “Is Squid impressed? Not really! She has to watch by the door as she keeps eating the soil”
Check for size using a carefully calibrated measuring device (perfectionists) or a small child (non-perfectionists).

Now you’re ready for your willow. Salix Viminalis or other Viminalis species are generally recommended as they are quick growing, hardy and ideal for living willow dens. However, there are other varieties of willow available and suppliers will be able to advise on suitable varieties. Willow is bought in long ‘whips’, normally between 6’ and 9’ in length. Longer whips are more expensive, but we found that these give you more to play with if you are not exactly an expert. Smaller whips are fine for small dens and structures.

Start by finding 6 of the sturdiest willow whips to make your entrance, bringing them together to form an arch.

You will need to tie these securely together using your garden string to ensure that you have a stable arch.

Once the entrance has been constructed the main structure can be built. Begin with several of the thicker stems and plant these vertically at about 30-40cm intervals around the willow den base. Tie opposite whips together where they meet to begin to form a dome shape. Then begin planting and weaving in the diagonal willow whips. The top of your willow den can be left open to grow before then weaving together, either because you want a nice tall structure or because your willow doesn’t quite meet up yet (either by error or design!).
Stems should be planted about 10cm into the ground. Cut a small cross into the mulch matting (if used) and push the stem into the ground if the soil is soft. If the soil is heavy you may need to use a wooden or metal pole to firstly make a hole or ensure that you have dug over the circumference of the den as per step 4.

More smaller stems can be planted diagonally, working around the willow den base as per step 10. These stems will produce more shoots and will make your den nice and bushy, whereas the vertical stems grow long and add to the height. Diagonal willow whips can be tied where they cross the vertical whips for a more stable structure or for a very precisely designed den. However, we found that this wasn’t needed for our ‘wild den’.
When your living willow den is complete you can add more structure by weaving in horizontal willow whips around the structure and from the top of the entrance arch to the rest of the structure. We did this at a later date. The floor of the den can be left as bare matting or play bark can be added.
How much will it cost?
A full sized Living Willow Den will cost around £35-65 depending on size.
Useful tips
Best Time to Build Willow can be bought from around November to March. December, January and February are the best months to plant as the willow needs to be planted after it has lost its leaves in the autumn and before it starts growing in the spring. Having said this, even if you leave it very late and don’t plant until the end of April you shouldn’t experience any problems. Care and Maintenance of Willow Dens After Planting You can also buy ‘dead willow’ which tends to be shorter in length and this can be used to weave horizontally to add more structure to your den. However, we just used left over whips from our Salix Viminalis bundle and wove these horizontally without planting to make the structure more sturdy (you can see these on follow-up pictures of our willow den) . Regardless of whether dead or living willow is used, as these are not planted in the ground they will eventually rot away. However this takes several years and your living willow den should be pretty sturdy by this stage. Either dead or living willow can also be weaved into your structure at any time if you have bare spots or need a little more support (or for repairs after little accidents). The planted willow needs to be kept well watered during the first few months. After this time we have never needed to water again, but mulching around the stems will also help retain water if the weather is dry. The willow den will grow quite rapidly during the first year. Weave new growth into the structure to help form an even growth all over your den.
 How you look after your willow after the first year will depend on how you like your den to look. The willow den can be pruned annually to keep the growth neat and confined or you may prefer the wild and bushy look. Some like to grow their willow den as tall as possible, whilst others like to weave it in for a compact look.

Don't forget to tag us or send us your photos if you have a go at building your own willow den!

